
Disassembly Instructions
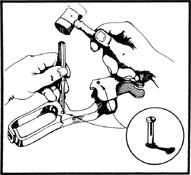
Remove the forearm screw (7) and the forearm (6). Remove tang screw (61) and buttstock (57). Open the finger lever (51) and remove the carrier screw (22) and magazine tip screw (32) from the forward end of the frame (21). Remove the magazine (49) with its enclosed carrier (34) and take out the mainspring strain screw (60), and then remove the mainspring screw (28) and mainspring (24). Close the lever (51), and then remove the hammer screw (62) and finally the hammer (25).
Remove the pin stop screw (not shown) from upper left side of receiver and drive out (right to left) the finger lever pin (13) from the forward hole in the right side of the frame. Remove finger lever link pin (52) and the link pin (46) (finger lever catch pin on later models); this is the pin that connects the link and the lower tang and also holds the finger lever catch in place. The finger lever (51), link (48) and trigger (45) can then be removed together.
Unscrew the sear spring screw (29) the forward screw on the bottom of the tang and drift out (I. to r.) the sear pin (31). Next remove the locking bolt (39) and the breechbolt (8). Further disassembly is not usually necessary or recommended.
The finger lever link pin and the finger lever lock joint pin may look like screw heads, but they require a punch for removal.

The carrier stop pin holds the carrier assembly in place. It must be punched out to permit removal of internal magazine pieces.
The magazine carrier simply lifts out after removing the stop pin (50). Some rifles use a V carrier spring and don't include this pin.
To Assemble the Gun
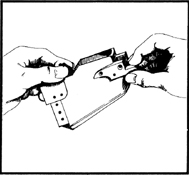
Assemble the breech‑bolt complete with firing pin (17), extractor (10), ejector (11), etc. Slip the bolt into the receiver (21) and then install the locking bolt (39). Next come the sear (30), sear pin (31), sear spring (23) and sear spring screw (29). Assemble the finger lever complete and install the assembly by driving in the finger lever link pin from the left side (52). Put in the finger lever catch (42), catch plunger (43) and plunger spring (44).
Attach the link (48) to the lower tang by the link pin (46) (called catch pin on later models), and drive in the finger lever link pin (52), connecting the link with the finger lever. The link should be attached to the tang with the trigger (45) in place.
Put in the hammer (25) and hammer screw (62) followed by the mainspring (24) and mainspring screw (28). Then screw in the mainspring strain screw (60). Install the magazine with carrier in place. The carrier (34) and spring (33) are held in place by the carrier screw (22) entering the left outside of the receiver. (On some rifles a flat V spring extending under the forearm operates the carrier.) Install forend and buttstock.